
Registering to TMC
In order to participate the course, you need to have an account on the TMC server. If you don't have account yet, click "Sign up" link on the top of the front page to create an account.
After signing up, you will see a list of available courses on the front page. When you click on a course name, you will get access to the course exercises, and can review your submissions and completed tasks.
Quick Summary
The rest of this page goes through instructions for setting up the C programming and TMC tools for your own computer. Different operating systems have different installation challenges, and the below instructions try to cover different known combinations as well as possible.
If you do not want to use Netbeans, you can also use command line tools and a separate editor, such as 'vim', 'emacs', 'gedit' or 'kate'. In this case, you'll likely want to set up tmc-cli, that allows fetching exercises and submitting them to TMC. See instructions below about how to do that.
If you are not going to install anything to your own machine, you can directly jump to the section about how to use Netbeans and other tools.
Setting up the programming environment
Quick links to platform-specific instructions:
Short summary
Here are instructions for setting up the programming environment in your own machine. There are following parts in the below instructions:
-
Installing the basic command tools needed for compiling, debugging and locally testing of the C programs, i.e., gcc, make, check, pkg-config and gdb. It is important that you do this step first, before setting up Netbeans or tmc-cli.
-
Option A: If you prefer to use command line and editor of your choice, you can install a command line client for downloading exercise templates and submitting them to the TMC server. You can find detailed instructions for this below.
-
Option B: If you prefer to use Netbeans graphical IDE, you can find below the instructions to install Netbeans, and the plugin that allows easy downloading and submission of exercises to TMC server.
-
It is also possible to not use either of the above options, but to submit exercises using the TMC web interface in zip package. This may be a bit inconvenient, but a possible fallback, if neither of the above options work (or satisfy) you.
Following platform-specific problems are known:
-
On Windows and Cygwin, local tests are known not to work in all cases. If local tests still do not work, it is possible to directly submit exercises to the server, that will compile and test them on a Linux platform.
-
On Mac OS 10.10 Netbeans does not find pkg-config even if installed properly. Workaround is to start Netbeans from the Terminal window after it is installed.
-
On Mac OS 10.6 (and older version) JDK 7 cannot be installed, and therefore Netbeans cannot be installed. In that case you will have to use the command line tools as described below, or if you want to try Netbeans, use Virtualbox virtual machine.
Linux
In Linux distributions the gcc compiler and make tool needed by exercise packages are usually installed by default. However you should to ensure that the check framework, zip and unzip, gdb and valgrind are also installed, typing the following in the terminal (assuming you have admin rights to the machine, and you are using either Debian or Ubuntu distribution):
1 2 3 4 | sudo apt-get install check sudo apt-get install pkg-config sudo apt-get install valgrind sudo apt-get install gdb |
Many of these packages might already be installed in your system, in which case you'll get a note about that. If you need to fetch and submit packages as zip package (not recommended), you'll need to install 'zip' and 'unzip' as well.
If you want to use Netbeans, see below for installation instructions.
Mac OS
In Mac OS, the C compilers come from the XCode package that can be installed from app store. In addition you'll need command line tools for development.
-
In Mac OS X Mountain Lion (10.8) these can be downloaded using this package.
-
In Mac OS C Mavericks (10.9) these can be installed by typing
xcode-select --installin Terminal window, and following the instructions. -
Mac OS Yosemite (10.10) has not yet been tested by the course staff, but you'll similarly need C compiler for it. Possibly it happens the same way as with Mavericks.
You will need a package manager to install additional required packages. Howebrew is one such manager, and below instructions are made for it.
Open Terminal window. You can install Homebrew by typing
1 | ruby -e "$(curl -fsSL https://raw.github.com/Homebrew/homebrew/go/install)" |
Follow the instructions on the screen. More information about Homebrew is available here. When everything is done, start installing the needed packages:
1 2 | brew install check brew install pkg-config |
Unfortunately, setting up gdb and valgrind on recent versions of Mac may be more complicated, but there are instructions for example here.
In Mavericks (OS X 10.9), if you want to use these tools from NetBeans
or some other GUI application, you'll need to set the required paths
for the GUI applications by adding the following line to
/etc/launchd.conf. One way to do this is to type the
following three lines in the terminal command prompt (the first will
ask your password):
1 2 3 | sudo su echo "setenv PATH $PATH" >>/etc/launchd.conf exit |
After modifying launchd.conf, you'll need to restart machine for the path change to take effect.
Unfortunately the above does not work with Yosemite (OS X 10.10), but the Netbeans should work properly if started from command line, by typing
/Applications/NetBeans/NetBeans\ 8.0.1.app/Contents/MacOS/netbeans
The exact name may differ based on version number. The course staff does not own Yosemite systems, so the above has not been tested.
For installing Netbeans, see below.
Windows
Since with Cygwin we can't guarantee smoot flawless experience, we higly recommend using the VirtualBox image with Ubuntu and TMC-NetBeans installed for working on the exercise.
We have the installation for windows outlined below, and running exercises usually works, however, there are known issues regarding the lack of windows support.
Download Cygwin from www.cygwin.com. On the web page, click "Install Cygwin" link, and choose either 32-bit or 64-bit version of Cygwin, based on your system architecture. You can find this information in the Control panel's system information, but if you are unsure, choose 32-bit version. Click the setup-*.exe link corresponding to either of this versions, to download the executable. After downloading, click the file to run it.
Various dialogs appear asking for configuration information. Unless you want to change the default settings, just click "Next" through them, until you see a window for selecting packages to install. You'll need to choose the following packages. Click on top of "Skip" on the list to select it to be installed.
- Devel/gcc-core -- for the C compiler and related tools
- Devel/make -- for the make tool that the exercise packages use
- Devel/pkg-config -- needed by the tester tool
- Devel/check -- needed by the tester tool
- Devel/gdb -- for debugging your C programs
- Archive/unzip -- for extracting zip packages downloaded from TMC server
- Archive/zip -- for creating zip packages for TMC submission
After pressing "Next", the installer may recommend additional packages needed for dependencies, and in this case you should just click "Next" until the downloading and installing starts. This will take a while.
Unfortunately, because check does not appear to work perfectly in Windows, the local TMC tests fail in some (many) cases. The easiest advise for Windows users is to submit code to server for checking. Before submitting, check that the code compiles without errors or warnings, and do some your own tests by modifying src/main.c to see that your code behaves as you expect.
Using the command line client (tmc-cli) for building and checking code
If you do not use Netbeans, you can interact with TMC and submit exercises with the tmc-cli command line client. For command line client you need to have a recent Java installed (java 8 should at least be fine)
Installing the tmc-cli on unix systems happens by downloading the executable from
https://github.com/testmycode/tmc-cli/releases/latest and giving it execution permissions.
After first run, it'll add it to your .bashrc and will be accessible like other binaries.
After installing, you should use 'tmc login -s https://tmc.mooc.fi/mooc' to set up the server
address and your login details. It is important to set up the server
URL properly, to https://tmc.mooc.fi/mooc. Username
and password are the same you used when creating TMC account.
Select also the correct course you are participating.
The full usermanual can be viewed here: https://github.com/testmycode/tmc-cli#tmc-cli
The most common tmc commands you will need are the following (see instructions for more information):
tmc download: download exercise templatestmc update: check for updates in exercises and teststmc test: test the currently selected exercise locallytmc submit: submit the currently selected exercise to TMC server.tmc paste: send the current exercise to TMC-pastebin.
Installing Netbeans and TMC plugin
If you want to use Netbeans and TMC plugin, here are instructions on how to install them. Before doing these, install the debugging and testing tools following the above instructions on your respective operating system.
Netbeans needs JDK 7 that can be downloaded from this web site. Choose the right version based on you machine and download the package. In Linux, choose .tar.gz package and extract it to a location of your choice. For Windows and Mac there are installer packages that you'll need to run and follow instructions.
After installing JDK, download Netbeans IDE from netbeans.org. Note: The TMC plugin used in this course requires Netbeans version 8.0 or higher. Unfortunately many package managers, e.g. in Ubuntu, include an earlier version, so you'll need to download NetBeans manually. Important: there are multiple variants available on Web page. Install a variant that supports C/C++. You will get an installer package (e.g. netbeans-8.0.1-cpp-linux.sh) that you'll need to run to install NetBeans.
After successfully installing Netbeans and launching it for the first time, you can install the TMC plugin. Here is a short summary how to do this:
- Go to "Tools" menu, choose "Plugins" menu item. A window opens.
- Click "Settings" tab on the top of the window, click "Add" button on the right side of the window. A dialog opens.
- Type "TMC" to the name field. Type (or copy-paste) "http://update.testmycode.net/tmc-netbeans_mooc/updates.xml" to the URL field. Click "OK".
- The dialog closes. Click the available plugins tab (second from left). Type "tmc" to the search field on top right part of the window and press enter. Only one entry, for "Test My Code plugin" should show up. Click the install checkbox on the plugin, and press "Install" button on bottom left of the window.
- Plugin installer dialog shows up. Click next and agree with the license agreement. Press "Install" button once more on bottom right.
- There may be warnings about unsigned plugins, but just click continue (trust me).
- If Netbeans proposes to restart, do so.
When you restart Netbeans, a new dialog should show up for configuring the TMC plugin. If it does not open automatically, you can open it by going to "TMC" menu on top, and choosing the "Settings" menu item. In the dialog, type the username and password you used for creating TMC account. Also verify that server address is https://tmc.mooc.fi/mooc (should be correct by default). Choose the correct course (you may need to press "Refresh list" button).
Troubleshooting
-
Sometimes the buttons to run local tests or submit the tests turns gray. The most common reasons for this is 1) you have not selected the correct project on the project panel in the left side of the window. Click on the correct exercise set; 2) you have not logged in properly (for example, have mistyped password).
-
If an error with '401' or '403' code appears, the most likely reason is that your username or password is wrong.
-
When pressing Run - button, Netbeans executes the test executable. If this happens, you can set the executable in the following way: Go the Project Properties in File menu. Choose "Run" page from the window that opens. Under this page, find "Run Command" setting, and change that to "src/main" (instead of default value ${OUTPUT_PATH}).
The Exercise model
The exercises are packaged into software projects that are downloaded from the TMC site. For larger exercises there is single project package per exercise, but sometimes multiple small exercises are combined into the the same package. The name of the project package should indicated clearly the module and the task number(s) the package contains.
Inside the package there are templates for the functions that are described in the exercise description, and related files needed to compile and build the code: Makefile, include headers, test framework components, and a few others. The figure below shows the directory hierarchy and the location of the most important files.
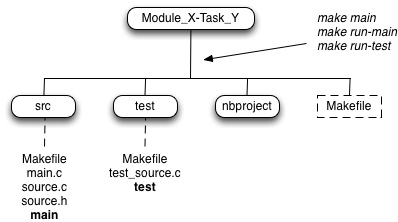
There is a top-level directory of the form "Module_X-Task_Y", where X and Y represent the module and task numbers. The exercise work mainly happens on files in "src" sub-directory. In the first exercises the functions that need to be implemented are in "source.c" file. In many cases, particularly in the beginning, there are placeholders for the function definitions, but their implementation is empty, and typically one function corresponds to one exercise (or its subtask). Sometimes there are additional completed functions you can (or need) to use in exercise, and sometimes there are functions that are half-ready, and you'll need to fix them. Your task is to fill in the implementations according to instructions. In some cases the name of the source file(s) can be different -- in this case this will be mentioned in the exercise description. "main.c" file can be used to test the functions you have implemented. It contains the main function where execution starts when you run your program. Usually there is an example implementation of the main function, but you can freely modify it to test different things. The main function is not investigated by the exercise testers. "source.h" contains the function definitions from source.c, and sometimes additional type declarations. "main" is the executable file that is created when you compile the source code successfully.
The "test" directory contains the code that tests your implementation. You do not need to touch this directory, but if you are interested, you can take a look at "test_source.c" to see how the functions are evaluated. The "nbproject" directory contains information needed by the Netbeans IDE. It is better not to touch it, particularly is you want to use Netbeans.
After you have done the exercise (or parts of it), the software project package with your modifications is uploaded back to the TMC server in a zip package. The server checks the exercises, and gives points for correctly completed exercises.
In short: in the first two modules src/source.c is usually the only file you must modify to complete exercise. It is also useful to also modify src/main.c to test your code in different ways before you submit it to server.
Building and checking software
Netbeans
Netbeans' TMC plugin automatically proposes to download the exercise templates for you. If this does not work for some reason, you can download them using the "Download/update exercises" menu item in TMC menu. After they have been downloaded, you can find the exercise projects in the left side of the window. You can navigate inside the project by clicking the tick-mark on the left side of the project name. Proceed in this hierarchy until you find src directory and files source.c and main.c. In the first exercises, you need to implement the function templates in file source.c. Double-clicking on the file name opens the file in editor.
After you have written a piece of code, the first task is to check that it compiles and does not result in compiler errors or warnings. Click the hammer logo at the top of the Netbeans window to compile the project (including all its C source files) and produce executable. If compile is successful and does not result in errors, an executable file titled "main" will be produced in the src directory. If there are errors or warnings (at the bottom of the window there is space for output), read the messages carefully and try to fix your code accordingly, and try to compile the code again. Repeat this until there are no more warnings and errors.

When the code compiles without warnings and errors, you can try to run it using the green arrow on the right side of the build button. The output will again be shown at the bottom of the Netbeans window. Check that the output shows what you expected. Many programming errors are such that the compiler does not catch them, but you only notice them from unexpected output. If the output is not as you expected, try to fix your code and recompile it, and then try running it again. Note: in C programming, you always need to recompile your code after you have modified the source. Otherwise the changes do not take effect in the executable. Many IDEs automatically detect changes and recompile code when needed, though, but it never hurts to be cautious about this. The course exercise projects produce two executables: one for the main.c under the src directory, that you can use for your own testing, and another for the exercise testers. Sometimes, after pressing the run button, Netbeans asks which one to run. Pick "main" under the src directory in that case.
If you think the code works, you can use the TMC checker to see if it agrees with you, by using the eye button on the right side of the button panel. The checker performs different tests on the different functions, and if everything gives correct result, it reports "Pass" on the particular task. If there are errors, it reports "Fail". In that case you'll need to figure out what is the problem (the test gives you some output that hopefully helps), fix the code, recompile it, and re-try the test. There is a separate test for each function and task, and the green/red meter shows you how many percent of tests in the current project you have passed.
When you are happy with your test results, you can submit your code to TMC server using the rightmost button with upload arrow, that once more checks the code and gives you points for successful tasks. After this you are done with this group of tasks, and can move to next project. It is also possible to upload the code even if not all tests pass. You can do earn points for those tasks that worked. You can always later resubmit the code, after completing more tasks.
TMC has a feature for requesting code reviews of the submitted code. Because of the large number of students on the C course, this feature is not in use. You can request a review, but it is unlikely that anyone acts on it.
Command line
If you prefer to work on the command line, it is recommended that you use tmc-cli, as described above. If this does not work for you for some reason, an alternative is to submit exercises through the TMC web interface.
Start by downloading zip package, and extracting it to a chosen place (e.g. using "unzip" in Linux terminal). Go to the project directory extracted from the zip (Module-_X/Task_Y), and edit "src/source.c" (or other source file, depending on the exercise) with your favorite text editor based on the assignments. when you want to test that the code compiles, you can type make main on the command line. As in the case of Netbeans IDE, check the compiler output, and if there are errors or warnings, fix the code and rebuild the code.
When there are no errors or warnings, you can run the code. You can do this by typing make run-main. Check if the output matches your expectations. If there was incorrect output, try to fix the code and recompile it after that.
If output looks correct, you can run the TMC tests locally by typing make run-test. For each test there is a line of output, that ends either in Pass or Fail. Typically there is one line of output for each task in the project file. If some tests result in failure, a message is provided that hopefully helps you solve the problem. In that case try to fix the code, and recompile it.
Once you are satisfied with the test results, you will create a zip package out of the project. Go up one level in the file hierarchy, and in Linux terminal type something like "zip -r project.zip Module_X-Task_Y" to create the package. The -r option is important, because it tells to recursively include subdirectories. You can upload the zip package in the TMC web interface, by choosing the appropriate exercise project from the list, and on the page that opens using "choose file" button to select your zip package, and then pressing "Submit". The system analyses your code for a while, and the gives output about the results. If everything went fine, you can move to next exercise project.
Installing VirtualBox image
There is a a VirtualBox image based on Ubuntu Linux 14.04 that has the needed software readily installed, including the tools needed for local checks and Netbeans with TMC plugin. If the native installation does not work for you, you could try if the VirtualBox image does. The downside of this approach is that the VirtualBox image is large: the package you'll need to download is slightly over 3 GB, and when installed, the virtual instance will take about 8 GB from your hard drive. On execution, the instance also uses up to 1 GB of RAM, that may be problem in small systems. Additionally, your hardware should support virtualization (e.g., through AMD-V or Inter VT-x), otherwise executing the virtual instance is very slow. In some systems these are disabled by default, but can be enabled in BIOS. In modern systems Virtualbox should work fairly well, though.
The VirtualBox image can be downloaded here (3.5 GB). Unfortunately the current image does not have tmc-cli pre-installed but you can easily install it yourself, based on tmc-cli installation instructions.
You can download VirtualBox software from their web site. Follow the instructions to install it from the package. Once installed you need to import the Virtual Box image you downloaded, named "mooc.ova", using the "Import Appliance" menu item from "File" menu. A dialog appears, in which you should click "Ok" or "Continue" to proceed with installing the image. After installation, it will appear on the left side of the main window. Click "mooc" item and press "Start" on the top of the window. A new window opens where virtual Linux instance starts to boot up.
The username for the virtual Linux system is "mooc", and the password is "mooc". You do not need to separately login to the systems, but sometimes you may need the password, for example if the Ubuntu system wants to update existing software packages. You can launch the Netbeans IDE from the icon on top left corner of the Linux desktop. The virtualbox image already has the TMC plugin installed, but you'll need to configure your TMC username and password in the Settings dialog you can find from the "TMC" menu. More detailed instructions are same as above in the Netbeans installation section.
You can use the command line also with the VirtualBox image. Just open the terminal window (see icon on the left), and follow instructions above. You don't need to install Check or Valgrind, they are already available in the virtual instance.
Pastebin
If you have problem with your code you cannot solve, you can send it to pastebin at the TMC server so that the course assistants can see it, and possibly help with your problem. Note: also other students who have already solved the particular exercise package can see the pastebin post (and possibly help). After submitting to pastebin, you will get an URL that you can copy and paste for example to IRC.
If you are using Netbeans, pick "Send code to TMC pastebin" from TMC menu. A window opens, where you can supply a comment or question. Then press "Send", and you will get a link back that you can copy to IRC (or Email).
If you are using tmc-cli, you can type tmc paste to
submit the currently selected exercise to pastebin.
If you are using neither Netbeans or tmc.py, you'll need to go to TMC server, choose the correct exercise and select the zip package that contains your code. Before submitting, click "Submit to pastebin" checkbox. You will get a submission confirmation page. Click "View submitted files" and use the resulting URL as your pastebin URL.